Skip navigation

UCAS\Discovery Adviser booking guide

Use this guide to help you manage your group booking(s) for UCAS exhibitions.

Top tips to get your group members registered

  • All students need to have a UCAS Hub account to register for an event - to provide your students with a more personalised experience prior to attending the events and with their onward journey with UCAS, we are asking all your students to register with the UCAS Hub before registering for an event. This can be done in advance or at the same time as registering for an event by visiting https://www.ucas.com/dashboard.
  • Students should use their personal email address to register so they can get updates all year round and when they finish school.

There are 2 ways you can invite your students and colleagues to register: 

Group member registration options

Option one - invite your students to register via your booking portal

  • Log onto your group booking portal call your E-Net account (www.ucas.com/enet)  
  • Choose the Manage Group Bookings tab at the top of the screen.
  • Choose the Email Invitations tab. 

This section of your account allows you to send email invitations to the students and advisers that you would like to join your group.   You can send out individual invites or upload an Excel file to bulk invite.  When uploading an Excel file there only needs to be two columns, with column headings as shown:    

invite-list-column-headers.jpg

  • You will need to upload a list of students and a separate list of advisers.  
  • Select Adviser or Student to define the type of contacts you are uploading.
  • Select the timeslot you are inviting your contacts too.  

Once uploaded, your contacts are automatically sent an email with a personal link (which expires after two weeks) to register against your booking.  

To resend the invitations to your students click "Resend Incomplete".

Option two - Email booking instructions to your students

You can copy these instructions to send to your students by tweaking a few pieces of information. Direct your students too: 

  • Visit https://www.ucas.com/dashboard to set up or login to your UCAS Hub account. All students need an account in order to register to attend an event. 

  • Login to your UCAS Hub account and go to the following:

    For UCAS Discovery Events:
    https://www.ucas.com/undergraduate/what-and-where-study/open-days-and-events/ucas-discovery-exhibitions. Find and select the event you are attending. 

  • Click on the BOOK NOW button.  

  • Then click STUDENT 

  • JOIN GROUP BOOKING.  

  • Enter the booking reference your teacher has provided: UCASBKN###### [Advisers - your booking reference to provide to your students/advisers can be found in your group booking confirmation email from events@ucas.ac.uk

  • Fill out the registration form 

  • You will receive a confirmation email that has a link to your personalised ticket. 

  • Please bring your personalised ticket to the event, either on your mobile phone or as a printed ticket.

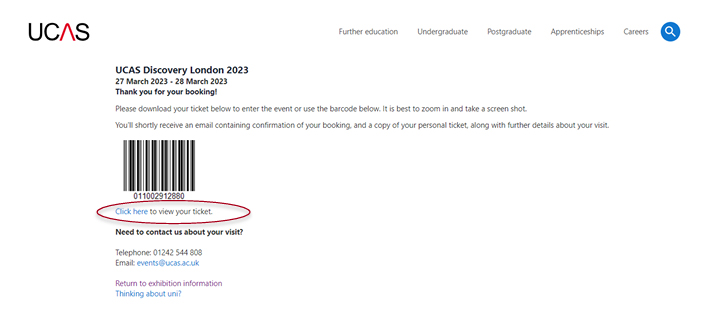
How to use group booking

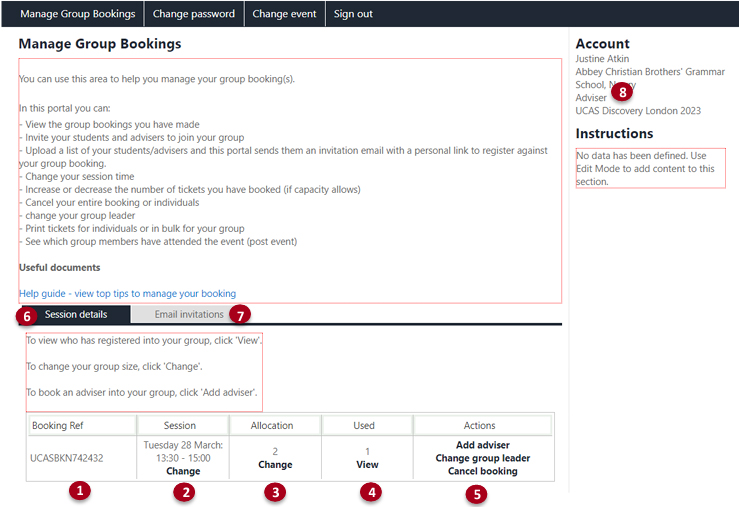
Once you login to your booking, you will see the following screen:

e-net-adviser-landing-page.jpg


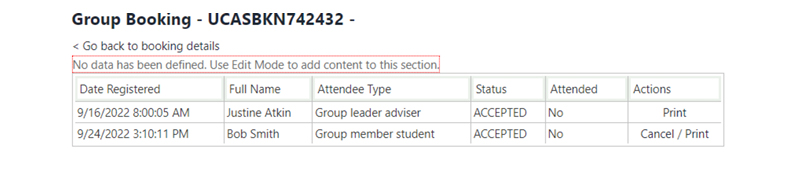
Session details section  

  1. Booking Ref - your unique booking reference.
  2.  Session – session time slot(s) booked for your group – you may have more than one session booked. You only need to book your arrival time. You can stay at the event as long as you wish.  
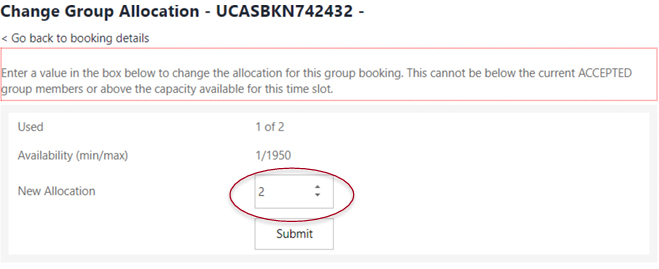
  3. Allocation - number of tickets reserved for your group.  
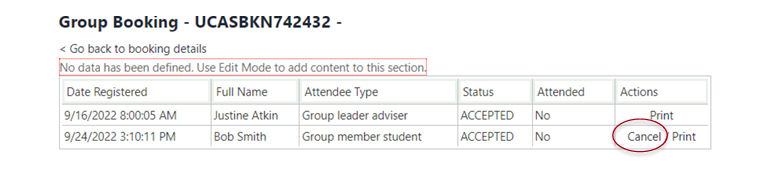
  4. Used - number of individuals registered for your group.  
  5. Actions – Add (register) an adviser, change your group leader (to another registered adviser) or cancel the session you have booked.  
  6. Session details - current page is under a dark grey tab.  
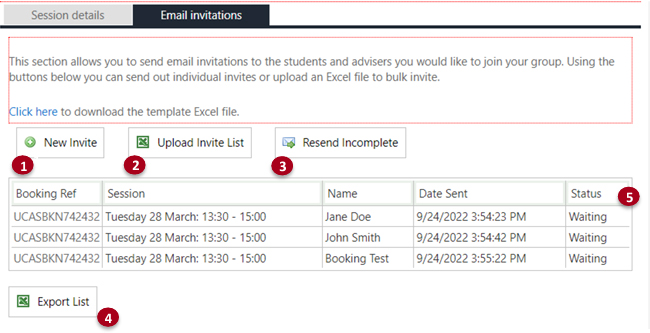
  7. Email invitations – click this tab to invite your students and advisers (group members) to register for their personal ticket.  
  8. Your school name and the event you are managing.

A downloadable risk assessment is also added to this page, four weeks prior to the event.  

Email invitations section

e-net-adviser-email-invitation-page.jpg


  1. New Invite – this option allows you to add individuals and invite them manually to register. Individuals receive an email with a personal link. This expires in two weeks. Click ‘Resend Incomplete’ to resend emails to your list.  
  2. Upload invite list – click this option to upload an Excel file of your contacts to bulk invite - a template file is available to download from this page to help you. When uploading an excel file there only needs to be two columns, with column headings as shown (a template file is available to download): 
    invite-list-column-headers.jpg


    • You will need to upload a list of students and separate list of advisers.
    • Select ‘adviser’ or ‘student’ to define the type of contacts you are uploading.
    • Select the timeslot you are inviting your contacts too.

    Once uploaded, your contacts are automatically sent an email with a personal link (which expires in two weeks) to register as part of your group booking./p>

  3. Resend Incomplete – click to resend emails to your list of people who have not registered.
  4. Export List – you can export a list of all the invitees and their status.
  5. Status – ‘Waiting’ shows that an invitation has been sent. ‘Accepted’ will appear when the individual has registered.

FAQs

All of my allocation/tickets are taken so my students and advisers cannot register.

You can login to your Events E-Net account as a Group Leader to increase your booking capacity (allocation) if spaces are available. Please contact us if there is no option to increase. 


e-net-allocation-change.jpg

I want to cancel some student registrations as they are no longer attending or are duplicate bookings.

You can login to your Events E-Net account as a Group Leader, In the ‘used’ box, click ‘view’. A list of all your registrants will appear. Under ‘actions’, click ‘cancel’ next to the registrants that you would like to remove.  


e-net-cancel-student-booking.jpg

How do I see who has registered as part of my group?

Login to your E-Net account, under the ‘Used’ section, click ‘View’. You will see a list of those registered on your booking. 

How can my students update or change their email address?

Login to their Hub account via https://www.ucas.com/dashboard#/ where they can change their email address and update their preferences within their account.

How do I update or change my email address?

email events@ucas.ac.uk with the details of the change or call 01232 544 808.

How can I print tickets for my group?

Login to your E those registered Net account, on under the ‘ Used section, click ‘ View ’ . You will see a list of your booking. You can either print individual tickets by clicking the ‘ Print ’ on same line as individuals or download a zip file with all the tickets.


e-net-print-group-tickets.jpg

How can students access their ticket?

On completion of their booking, students and advisers will see the screen below where they can click to download their ticket. A screen shot of the barcode can also be taken Students also receive a confirmation email with a link to their ticket .


e-net-booking-finish-page.jpg

What if we have not received the confirmation email or my students are not receiving emails?

Can I see which of my students have attended the event?

Yes, you can login to your Events ENet account as a Group Leader, In the ‘used’ box, click ‘view’. A list of all your registrants will appear. Under ‘attended’, you will see a Yes for those who have attended and a No for those who have not. Please note that if a student has had to reregister, due to ticket issu es on the day, they may not show as Yes.


e-net-attended-status.jpg

Where can I access a risk assessment for the event?

A downloadable risk assessment is also added to your ENet booking portal page, four weeks prior to the event.